Chapter 5: Building the App
Time to build the core of GratitudeTree. By the end of this chapter, users can create entries, see them in a feed, edit, delete, and upload photos — all persisted in Firebase.
This is the biggest chapter in the tutorial. We'll build the entry creation form, define our data types, connect to Firestore, build the feed, add a post detail view with edit and delete, compress images, and clean up the display. Let's go.
What You'll Build
- An entry creation form with text and photo toggle
- TypeScript types for your data model
- Firestore integration for real-time persistence
- A social-media-style feed with entry cards
- A post detail view with edit and delete
- Image compression for photo uploads
- Offline persistence
Step 1: Build the Entry Form
Right now your app has a nice shell but no functionality. Let's build the entry creation form. Send this to Claude Code:
$ claude "Ok. I want to now start building the entry form for a memory. It needs: a toggle..."Test it
npm run dev
Navigate to the Create tab. You should see a form with a text/photo toggle. Try switching between modes — the inputs should change. The Save button won't do anything yet, and that's expected.
As of now, nothing is getting stored. We need to define our data types and connect to Firebase first.
Step 2: Define Types and Set Up Firebase
Now let's define the data model and make sure Firebase is properly configured. Claude Code will ask you for any values it needs:
$ claude "Lets define the entry type for this project first and set up firebase as needed...."The .env file must be in your project root — the same folder that contains package.json. If it's nested inside src/ or anywhere else, it won't work. You must restart the dev server (Ctrl+C then npm run dev) after creating or editing .env.
Step 3: Wire Save to Firestore
Next step is wiring the Save button to actually write to Firestore. Send this to Claude Code:
$ claude "Wire up the handleSave in the entry form to actually write to Firestore. Create ..."What just happened
Instead of storing entries in memory (where they'd disappear on refresh), we're saving directly to Firestore. This means:
- Entries persist — refresh the page and they're still there
- Real-time sync — changes appear instantly without refreshing
- Cloud-hosted — your data lives on Firebase's servers
The onSnapshot listener is the key — it watches for any changes in the Firestore collection and automatically updates the UI. It's like a radio that's always tuned in.
Firestore rules (development)
Before you test saving entries, confirm Firestore Database → Rules in the Firebase console allows access to your entries collection while you're still before authentication. For local development, rules often look like this — open read/write on entries, then Publish if you see an unpublished changes banner:
rules_version = '2';
service cloud.firestore {
  match /databases/{database}/documents {
    match /entries/{entryId} {
      allow read, write: if true;
    }
  }
}
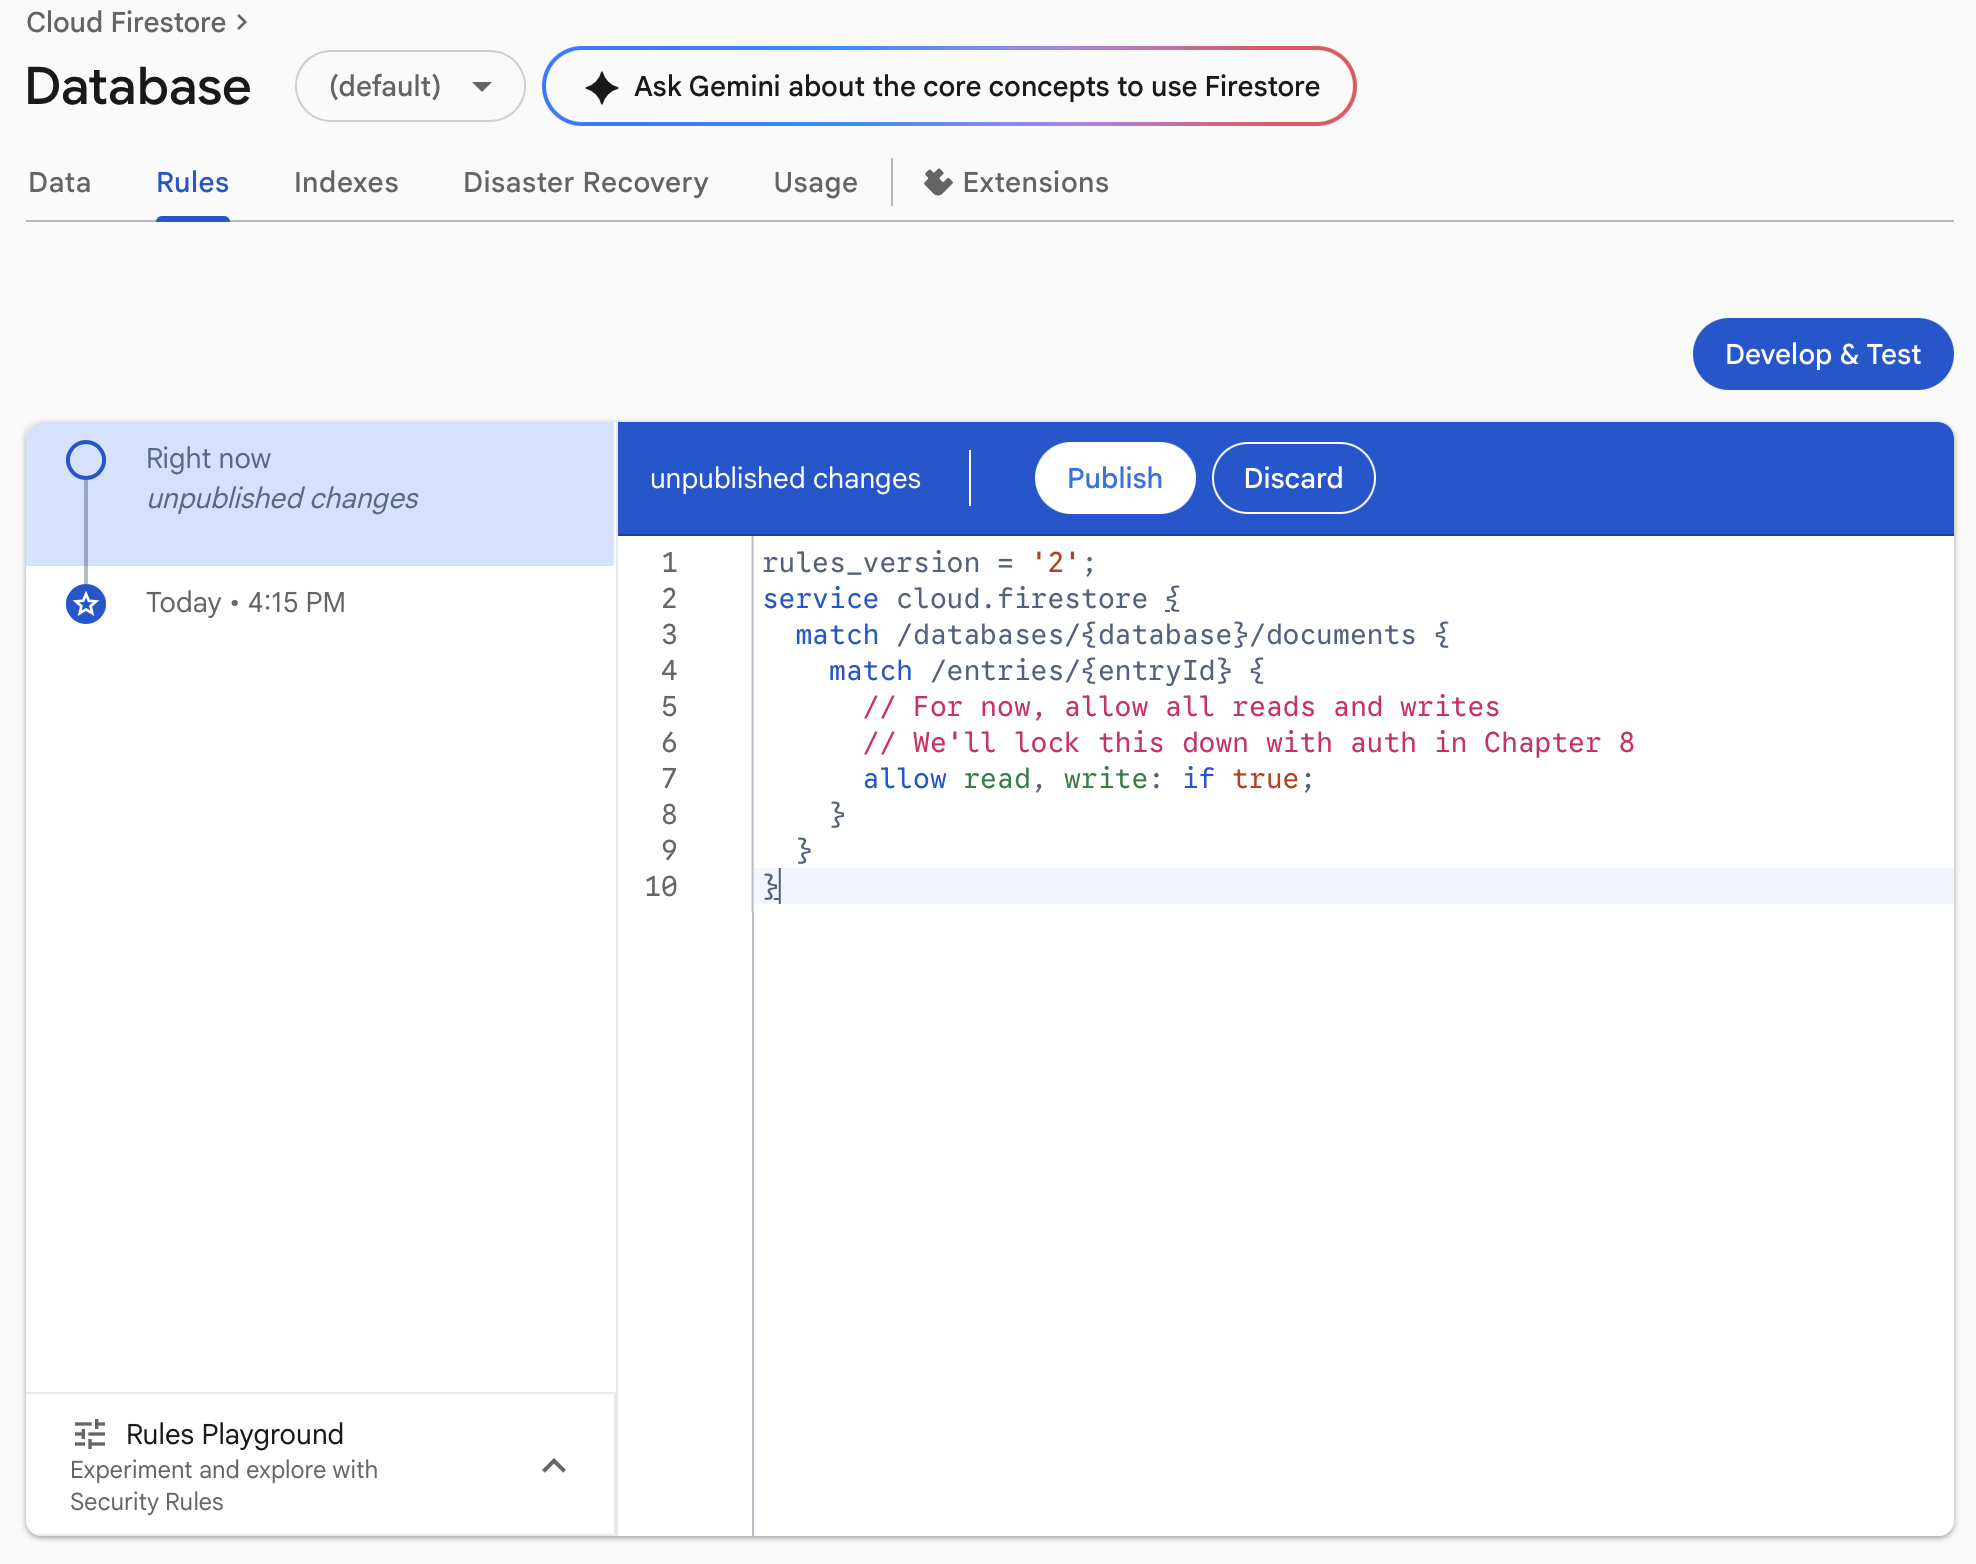
These rules let anyone read and write entries. That is fine on a personal dev project. In Chapter 6 — Authentication, you will replace them with rules that require a signed-in user and match each document's userId.
Step 4: Build the Feed
Now let's build the feed page where entries are displayed:
$ claude "Lets update the feed page to create feed type cards similar to social media apps..."Test it
npm run dev
- Go to the Create tab and write a text entry
- Save it
- Switch to the Feed tab — your entry should appear as a card
- Refresh the page — the entry should still be there (this is the big moment!)
- Create a few more entries — they should stack newest-first
Step 5: Add Post Detail View with Edit and Delete
Each entry needs a detail view where users can edit or delete it:
$ claude "For each feed card, add a tap/click handler so that when I tap a post, it opens ..."Test the full CRUD flow
- Create — make a new entry, it appears in the feed
- Read — tap an entry card to open the detail view
- Update — tap edit, change the text, save — it updates
- Delete — tap delete, confirm — the entry disappears
- Refresh — all changes should persist
Step 6: Clean Up and Review
Let's have Claude Code review everything and fix any issues:
$ claude "Review my project and make sure everything is working correctly. Check for any e..."Step 7: Add Offline Persistence
Firestore has built-in offline support. When the user goes offline, reads come from a local cache and writes are queued until the connection returns. Let's enable it:
$ claude "Update src/lib/firebase.ts to use initializeFirestore with persistentLocalCache ..."Step 8: Add Image Compression
Phone cameras take huge photos (3000x4000 pixels, 4MB+). We need to compress them before uploading:
$ claude "Create an image compression utility at src/lib/image.ts. The compressImage funct..."Your images may not look nice when uploading to the feed at first — the display might cut them off or stretch them. Don't worry, we'll fix that next.
Step 9: Fix Image Display in Feed
Let's clean up how images appear in the feed:
$ claude "Improve how uploaded images appear in the feed cards: the entire image should al..."Step 10: Set Up Storage Security Rules
In the Firebase console, go to Storage → Rules and set up basic rules. For now, allow reads and writes with a file size limit. We'll lock this down further when we add authentication in the next chapter.
Step 11: Commit Your Progress (Optional)
If you're using Git:
git add .
git commit -m "Add entries: creation form, Firestore persistence, feed, detail view, image compression"
Don't hesitate to paste error messages directly into Claude Code and ask it to help you debug. You can also copy errors from your terminal and ask Claude Code to explain what went wrong and how to fix it.
Checkpoint
Your app should now:
- You can create text entries and they appear in the Feed
- You can create photo entries with image preview and optional caption
- Entries persist across page refreshes (stored in Firestore)
- You can tap an entry to open a detail view
- You can edit any entry from the detail view
- You can delete any entry with confirmation
- Images are compressed before upload
- Images display properly scaled in the feed (not cut off)
- The Firebase console shows your entries as documents
What's Next
Your app has real functionality with persistent data. But right now, anyone can see everyone's entries. In the next chapter, we add authentication — login, signup, and private data.
Follow @parvsondhi for build threads, tips, and updates on this tutorial.